 |

December,
2000
Hello
and welcome to WolfsburgWired, the monthly online newsletter of
information for customers and friends of Wolfsburg West. |
|
|
Beetle
Horn Troubleshooting
A
malfunctioning horn is a dilemma that every Beetle owner
encounters sooner or later. The diagnostic procedures used
to troubleshoot horn circuit problems are basically the
same as most other electrical components on the Beetle.
There is a source positive electrical current, a source
for negative current, and a means to connect the two in
order to actuate the particular device. What makes the horn
circuit unique is the way in which the current flows to
the horn. When you visualize an electrical circuit, you
probably envision a wire which carries positive energy,
and a wire or contact point to carry negative energy. In
the Beetle horn circuit, the steering column (the actual
tube that you see under the dash) is also used to carry
the negative current from the steering wheel to the horn.
The idea that the tube is used as a conductor is no revelation.
It is understanding the flow of current in the circuit that
makes pin pointing the ele- ctrical problem much easier.
One
note before we move on. Bus owners are spared many of the
headaches listed below as the horn activating circuit consisted
of a wire running from the button to the horn. It doesn't
get much simpler. Although some of the tips we provide below
do apply to the Bus, this information is truly directed
towards the Beetle.
What
to look for first. Volkswagen used a diaphragm type horn that
consists of two elec trical connections. There is no polarity
on this type of horn so either terminal can accept the positive
or negative wire. Before pulling out the test light (resembles
an ice pick and has a wire protruding from one end of the
handle) take a minute to visually inspect the horn, its
connections and the fuse box. Make sure that all of the
fuses are in place and clean. Always replace fuses that
are questionable. Next have someone hold the horn button
down while you check for voltage at the horn itself. First
check the terminal that has the black wire with a yellow
stripe, this is the positive wire. If voltage is not present,
trace this wire back to its source, the fuse box. Check
both sides of the fuse. Current is supplied directly from
the battery to this point so you should find voltage on
both sides of the fuse.
Move
back to the horn. With your assistant holding the horn button
down attach your test light alligator clip to the black/
yellow wire while pressing the ice pick end onto the brown
wire. The presence of voltage here suggests that the horn
is at fault. The lack of voltage indicates that the wiring
leading from the horn through the button to ground is faulty.
We find that next to replacing the horn this is the most
common fault in the horn circuit.
Using
the diagrams below will help you trace the circuit as it
feeds through the steering column.
|
|
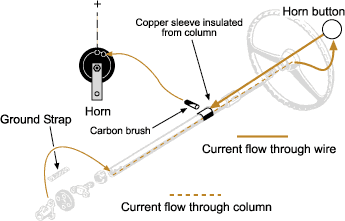
Through
1959 Deluxe models, through 1965 standard models
Current flow begins at the steering box, which is jumped
over the rubber steering coupler by means of a copper wire,
then flows up to the column. When the horn button is engaged,
current flows from the column through the horn button and
into the wire attached to the button. This wire terminates
on a copper sleeve/ slip ring, which is insulated and wrapped
tightly around the steering shaft. From this copper sleeve
current continues on through a carbon brush that presses
against this sleeve through an opening located on the side
of the steering column. The wire attached to the carbon
brush, brown in color, carries the current directly to the
horn and thus completing the circuit. Most of the problems
with this circuit are traced to the ground, which connects
horn button to the steering wheel. The horn button relies
on the tension of its retaining clip to provide an adequate
ground to the steering wheel. Always make sure that this
clip and the surface inside the steering wheel hub is clean
to provide for proper contact. This is a common problem
with steering wheels that have been painted in that this
area was not masked prior to paint application.
|
Through 1959 |
|
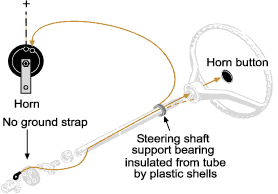
1960-1961
Deluxe model Beetles
This was the first year of the dished style wheel. Almost
everything about these two years is unique when it comes
to the horn circuit. The principals of this circuit are
basically the same as 1962-1967 (which we will mention next).
Instead of using a wire to run current from the horn button
down the column to a ground source, the steering shaft itself
was used as the electrical conductor. This meant that the
tube and the shaft would need to be insulated from each
other. VW did this by using plastic spacers and shims. Dont
bother calling for the components pertaining to this assembly
as they are very scarce. If you need replacement parts,
the best solution is to convert your arrangement to the
1962-1967 variety. You will need a steering column, steering
wheel and a horn ring with attaching hardware to make the
change.
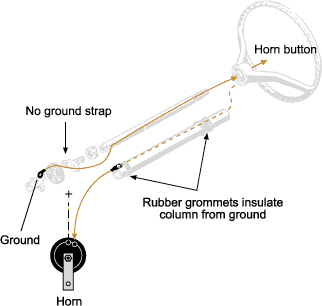
1962-1965
Deluxe model Beetles, 1966-1967 standard and Deluxe model
Beetles
Current flows starting at the steering coupler, steering
box side, where a wire is attached and feeds through the
center of the steering column to the horn button/ring. Please
note that these years did not use a ground strap that crossed
over the steering coupler. When depressed, the horn button
feeds current to the steering tube. At the end of the tube,
under the gas tank you will find a male connector. Attached
onto this connector is a brown wire that leads directly
to the horn thus completing the circuit. Poor connections
are the usual culprit with this particular span of years.
Also, insure that the chrome horn ring is mounted to the
steering wheel properly.
|
1960-1967 |
|
1968-1970,
all Beetle models
Vehicles used the new steering column that bolted directly
onto the dash without the insulating rubber grommets as
used on earlier vehicles. To compensate for this, VW added
plastic insulating shells around the upper support bearing.
Instead of running the wire down the column, as done in
1962-1967 years a wire was soldered to the bearing, which
ran directly to the horn.
|
1968-1970 |
|
1971-1979,
all Beetle models
Volkswagen made a full circle and brought back the brush
and copper slip ring to transfer the current to the horn.
The circuit is very similar to the 1959 and earlier layout
with exception of the slip ring. This was replaced with
a copper pick-up ring mounted to the base of the steering
wheel. A copper plate mounted to the turn signal switch
applies tension against this slip ring allowing the current
to pass through. From here the brown wire directs current
to the horn.
|
| |
|
VISIT OUR WEB SITE
If you'd like to find out about all the new items that have arrived since our catalog was printed, visit our web site at: www.wolfsburgwest.com
New items are added as they become available. You'll also find interesting information on the history of Wolfsburg West, a regularly updated calendar of area activities, and other good stuff, including archived back issues of WolfsburgWired.
You are receiving WolfsburgWired because you elected to subscribe to the WolfsburgWest
electronic mailing list. To UNSUBSCRIBE, please click here Leave Wired.
New subscribers are welcome. To SUBSCRIBE, click HERE.
Published by Wolfsburg West
Specializing in parts for the restoration of 1979 and earlier Volkswagen cars.
Email: wwinfo@wolfsburgwest.com
Web: www.wolfsburgwest.com
Snail: Wolfsburg West, 2850 Palisades Dr. Corona, CA 92880
Voice: 951-549-0525 ~ Fax: 951-549-0580 ~ Toll free (orders only): 888/965-3937
|
|
